You can change your Profile details including your Name, the Email address associated with your user, your Notification Settings, your TimeZone Settings, and so on. Click on your name in the header, as shown below.
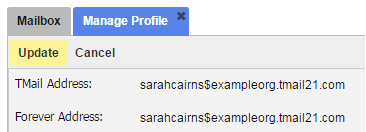
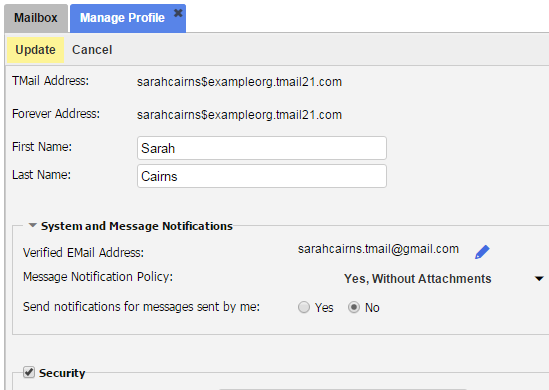
The Manage Profile tab opens, as below.
Name and TMail Address
Change your First Name or Last Name, as required.
Note: As the name suggests, your Forever Address can never change. However, your TMail address will change if your administrator associates a domain with your account.
Notifications and Email Address
You can see the Email address associated with your TMail account. You can define settings to receive Notifications at this associated Email address.
Note that an email address can only be associated with a single TMail address.
Change Email Address
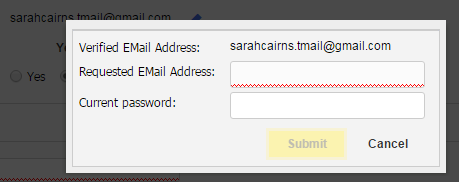
To change the Email address, click on the corresponding Edit icon. You can see the following.
- Requested Email Address: Enter the new Email Address.
- Password: Enter your current password. This is an additional step to authenticate that you are the right person to change this Email address. Note that you need to verify this new Requested Email address before it takes effect. (Please see Verify Email Address for more details.)
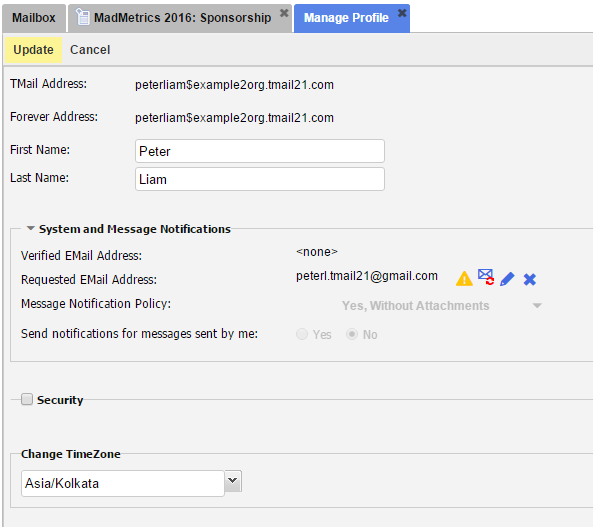
Click on Submit button to initiate the change in associated Email address. Once you do this you will see the requested email address in the Requested Email Address field. In the example below, the user Peter Liam has requested but not yet verified the email address. 
For the Requested Email Address field, you have following options.
- Resend Verification Email: Click on this icon to send the verification Email again at the specified Email address. You can use this if you don’t receive the verification email or accidentally deleted it. Make sure that you check your email spam folders as well. You receive an Email with a link to verify the Email address.
- Change Email Address: Click on this icon to change the Email address if you want. In Requested Email Address, write the new Email address. In Current Password, specify your current password. Click on Submit button initiate the change email address process.
- Cancel Email Address: Click on this icon to cancel the request to verify the Requested Email address.
EMail Message Notification Policy
You can define settings whether and when to additionally receive email Notifications in your email inbox when you receive a TMail Message in your TMail inbox.
You get these Notifications at the verified Email address. To access these settings click on the small down arrow. You will see the following options.
- No: If you do not want to receive any email Notifications when you receive a TMail message.
- Yes, Without Attachments: If you want to receive email notifications when you receive a TMail message, but without attachments.
- Yes, With Attachments: If you want to receive email notifications when you receive a TMail message, but with attachments. Note that with this option, you will not only have TMail attachments sent as email attachments, but also any Sections created or modified at this changeset will also be sent as attachments.
By default, TMail messages sent by you will not result in email notifications even if one of the “Yes” options above is selected. You can override this behavior by selecting “Yes” in the Send notifications for messages sent by me, select
- Yes: To receive email Notifications for all Messages that you send while using your account
- No: If you do not want to receive Notifications for your own Messages. This is the default.
Profile Image Privacy
You can define Privacy settings for who can see your Profile image. Click on the Privacy arrow and you see different options to enable show or hide option for your Profile image, as below.
The Privacy options are:
- No One: Select this option if you do not want to show your Profile image to any other TMail account holder, whether in your own Organization or outside.
- My Organization: Select this option to show your Profile image to all the Users in your Organization. You do not see this option if you have an Individual account type for TMail21.
- Anyone: Select this option to show your Profile image to any Person who has a TMail21 account.
Security: Change Password
Mark the checkbox available corresponding to the Security option. You can see the fields that enable you to change the current Password, as shown below.
- Current Password: Enter the current Password of your TMail account.
- New Password: Enter the new Password.
- Confirm Password: Enter the new Password again.
Note that you can change the Password only for the account that you used to login. In this example, Sarah Cairns is the account owner and she can switch to the admin account (to TMail address admin$exampleorg.tmail21.com). However, when Sarah is using the Administrator Role by using the Switch Roles option, Sarah can use the admin account but she cannot change the Password for this admin account. To do that, Sarah needs to login to the admin account directly.
Timezone Settings
In Change TimeZone, select the TimeZone based on your location or for your personal preference, to setup the Timezone that your account shows for TMails and Messages.
Click on Update TimeZone link to update the new TimeZone. Click on Cancel option to discard the change in TimeZone settings.
Header Theme
In Header Theme, you can see the current Theme of the TMail header. To change the Theme, select a color box. The header theme will temporarily change so that you can preview the Selected Theme.
If you want to apply the selected Theme, click on Apply Settings link. The selected color is applied (saved). Click on Cancel option to discard the change in Theme.
Save Changes
Some of the settings and changes are automatically saved in this Manage Profile tab. Click on Update link to save your changes in one or more fields for First Name, Last Name, Message Notifications, Privacy, and Security, as shown below.

Your Profile details are saved.


